Photobucket Photobucket Photobucket Photobucket Photobucket
Showing posts with label Furniture redo. Show all posts

Yay - I'm back - and with a new headboard!!

So - I am finally back! I took a week off to get caught up on projects and photo shoots and let me tell ya - I missed my little blog like crazy...

I was finally able to finish my headboard and we absolutely love it!

Here is a sneak peek of the finished job:


This was another really easy project (I got a little help from my Granddad) that only took an hour or so to complete.

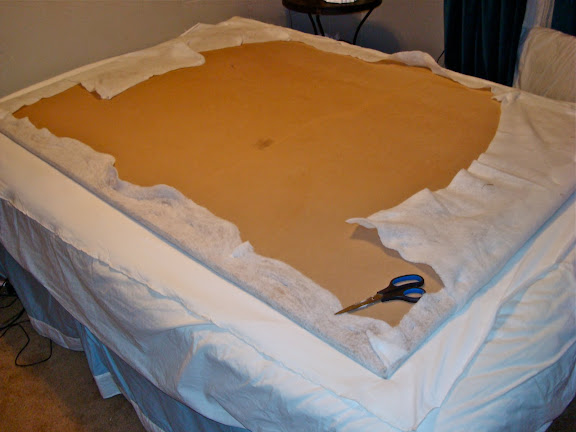
After measuring the space where the headboard would go I had my Granddad cut a piece of MDF. I needed something besides batting to pad it so I found an old egg crate mattress pad thingy and cut it to fit the MDF. Then I just spray glued it into place! After that I attached batting by stretching it around and stapling it to the back of the MDF.


Then I wrapped the white fabric around the whole thing and stapled it in place - and voila! It turned out to be sturdy enough that I didn't have to mount it to the wall - so that was a plus!


Here is a list of the supplies I used:

MDF - cut by my Granddad but if you usually can get it cut at the place you buy it
Spray Glue
Staple Gun
padding/batting
fabric

I already had everything except the fabric which I got in the clearance section at Hancock Fabric's for $2.00!




yada yada

So...we just got back from visiting my husband's mother in Michigan and I have had to do a ton of homework to catch back up and I just haven't had time to photograph any of my completed stuff (that and I haven't got anything completed this week). So I thought I would delight you with an almost finished project.

My granddad had a huge cabinet in storage that was just begging for me to rescue it. We were in desperate need for extra coat and linen storage and thought that it would be perfect.

Here is the before:


Notice how absolutely lovely it was...yucky. We had to saw part of the bottom and top off, sand it for hours, turn the doors around, put new sides on it, clean it, clean it some more, and finally prime and paint it.

This is what it currently looks like (sorry for the bad photos - I had to use a flash and they are cropped weird because of something else I am working on - for another project):


It's not quite done yet - notice the leg thingies on the bottom and the left door needs adjusting so that it will stay closed, and for some reason there is only 2 hinges on one side.

And this is what it looks like on the inside:


The reason for the close crop is because the insides of the doors are going to be revealed later on for another project feature!

It holds oodles and oodles of pillows (some really ugly ones that are about to be covered), 90% of my purses, coats, sheets, blankets, and more. Not quite gorgeous yet but definitely on its way!

Finally...

I finally finished this piece!!

Here is a sneak peek of it finished: (sorry for the bad pic - I photographed it at night. For some reason it looks so small. It's actually quite a large piece. Also - the mirror is not staying in that exact spot. It takes an act of congress to move it and I just haven't had the chance to tackle that task!)


I inherited this piece of furniture from my great grandmother (Big Mama). After staying in the shop for a few years it was in desperate need of refinishing and using.


Notice all of the peeling and missing original veneer. It took a while to get the rest of it off - I had to peel it by hand.

After sanding and sanding and filling holes this is what she looked like:


After several layers of bright white, semi-gloss paint, and Rustoleum Oil Rubbed Bronze spray paint on the drawer pulls I was finally finished!!!!


She now sits in our living room an holds office supplies.


yucky to yummy!

Karl and I recently added on a room to our home that we made in to our master bedroom. I wanted some new/custom furniture but as usual there was no room in the budget...So I found this dresser at a yard sale for $10.00. (it came with the mirror but I am going to use it for a different project)


It clearly had seen better days. I believe the previous owner used it in their kitchen - so it had lots of dings and scratches on the top and the inside smelled like rotten food.

Jingles has to check everything out...


After what seemed like days of sanding, painting, and some new knobs this is what it became!!:


The color is Behr Premium Plus Ultra (primer built in) in Ozone. This paint is my new favorite. It's a little pricey but it only took one coat and the color was perfect!!


Chair Redo

My desk/craft station is really tall so I needed a barstoolish type chair. I also wanted something with a back because I sit at my desk for long periods of time. Little did I realize that Grandma had just what I was looking for. I just needed updating...

I was a dummy and forgot to take a before picture - so you will just have to mentally visualize it :)

Before:

Scratched up pine colored wood, pink and seafoamy green Aztec printed seat cover (from the 80's).

After:

Upholstered Bench

Karl and I needed some extra seating at our new house. So - my Grandfather built us a bench out of an extra door he had laying around. Anytime I get the chance to upholster something I am really excited!

BEFORE:


AFTER:


Fabu Chair Redo

My Grandma gave me a chair to use in our new home that was handed down from another family member. I loved the structure of the chair - but the color and upholstery needed a redo.

So...here is the BEFORE:


A little old and faded...a little scratched up and rusty orange. Not exactly what fits into our decor. So after a some glossy white spray paint and some new fabric and ribbon you get the AFTER:


Related Posts with Thumbnails