Photobucket Photobucket Photobucket Photobucket Photobucket
Showing posts with label decorating. Show all posts

Fabric Wreath!

OMG - I can't believe that it has been over three months since I have posted anything!!! It's an understatement to say that I have been busy! My photography business is doing really well right now - but I missed my blog and all of my wonderful followers! Here is one of my first crafts of the Christmas season!

I love love shopping the fabric section at Hobby Lobby - so many bright and beautiful prints! I am constantly buying yards when it's on sale and I have finally found something to do with some of it.

Isn't she beautiful!


Here is how I did it:

I started off by wrapping my wreath form with a strip of fabric.


Once I got it completely covered I started with my little flowers. I cut tons of circles out of coordinating fabrics - 3 different sizes. I used some glasses to trace for my circles - but anything would do!

Next I stacked the three sizes on top of each other and just kind of "pinched" one side and folded it to the middle and then pinched the other side and folded it to the middle.


Then I just stuck a straight pen through the middle of the folds and stuck it in the wreath form.


And that's it! I made several different kinds out of some of my favorite fabrics!


Have a good Tuesday!!


Pretty Little Cloche

Aint' she a beaut!


I made this cute little cloche thingy out of things bought at GoodWill, the dollar tree, and a family heirloom brooch! I wanted to display the brooch that belonged to a family member that and was passed on to me (I'm not much of a pin wearer). A shopping trip to GoodWill yielded a cloche and a milk glass base to put it on!!!! I just filled milk glass dish with some Spanish Moss I got at the Dollar Tree, sat the brooch on top of it, and placed the dome over it!

Total amount spent: $3.50!!


Yay - I'm back - and with a new headboard!!

So - I am finally back! I took a week off to get caught up on projects and photo shoots and let me tell ya - I missed my little blog like crazy...

I was finally able to finish my headboard and we absolutely love it!

Here is a sneak peek of the finished job:


This was another really easy project (I got a little help from my Granddad) that only took an hour or so to complete.

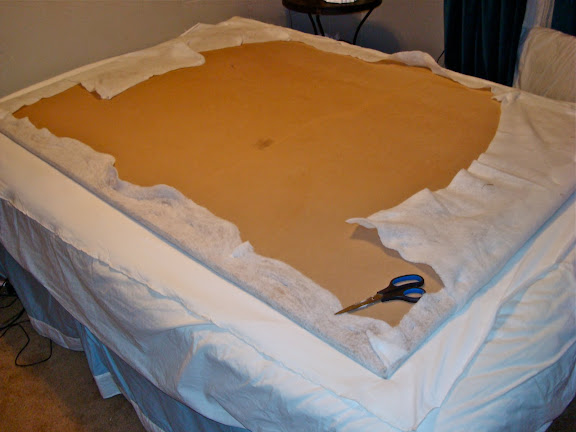
After measuring the space where the headboard would go I had my Granddad cut a piece of MDF. I needed something besides batting to pad it so I found an old egg crate mattress pad thingy and cut it to fit the MDF. Then I just spray glued it into place! After that I attached batting by stretching it around and stapling it to the back of the MDF.


Then I wrapped the white fabric around the whole thing and stapled it in place - and voila! It turned out to be sturdy enough that I didn't have to mount it to the wall - so that was a plus!


Here is a list of the supplies I used:

MDF - cut by my Granddad but if you usually can get it cut at the place you buy it
Spray Glue
Staple Gun
padding/batting
fabric

I already had everything except the fabric which I got in the clearance section at Hancock Fabric's for $2.00!


Yippee Skippee Part 2!!

As I mentioned in this post Karl and I were also working on a Race car room! Here is the final product - all hand painted by my super talented husband and me!

This is for above the bed:


And this is the super cool CHALKBOARD racetrack and race cars that completely circles the room!!


I'll be uploading this to all of my favorite linky parties!! Go here to check all of them out!!!


Yippee Skipee!

I am so excited about this post!!! Karl and I did this mural over the weekend for my cousin Deanna's new home. It's in her baby's (Reese) room. (Just imagine the crib in front of it!)


Sorry for the bad pictures. The lighting wasn't the best.

Karl free handed the shapes and I helped shade in the colors. Here is a close up of the super cute little birdie:


At the last moment we decided to add the owl at the top...here is Karl contemplating where to put it:


And here I am working on the branches:


We are also working on her son's (Garrett) race car room...pics to come later!!

I'll be uploading this to all of my favorite linky parties! Go to the link at the top to check all of them out!


Fabric Covered Monogram Canvas!

I have been trying to get this canvas done for a while now...it's finally done!!


I couldn't find my staple gun so I used hot glue to attach the fabric to the canvas.
Here's how I tackled the corners:

Pinch the fabric:


Fold over the corner:


Then fold it over again:


Hot glue it down (or staple it) and your all finished!!


The canvas is a recycled one from a previous project that no longer matches my decor, I already had the fabric (a whole roll of upholstery fabric for free), and I got the chipboard H at hobby lobby for 50% off!!!

I'll be uploading this to all of my favorite linky parties!!! Check out the tab above and go and visit them!!

Love...

I made this rag garland and decorated this mantel for my grandma...hope you like it!


Here is a close up of the garland:


and one of the other goodies! ( I even made the hurricanes out of vases and candle holders and made the hearts out of scrapbook paper!!):


total cost: 3.00 for the candy!!!

The Elusive Flame

I know everyone is tired of seeing things made out of books - especially wreaths - but I have just discovered them.

I turned this book:


into this wreath:


I don't have step by step photos but it was super easy to make. First I painted the edges of the book with a little black and brown paint. Then I rolled and folded the pages of the book and hot glue them to a dollar store foam wreath. I then attached a piece of ribbon to the back with hot glue to hang it.

You can go to this tutorial at Living with Lindsey for a similar wreath and detailed instructions!

I'm adding this to all of my favorite linky parties - click on the buttons on the right to go and check them out!

Make Your Monday @ The Twice Remembered Cottage!

<br />http://www.thethriftyhome.com


Photobucket


Beyond The Picket Fence

Make it Yours @ My Backyard Eden


It's a piece of cake...part 1

I've been looking for a milk glass cake plate forever - but I have yet to find one within my price range. After months and months of searching I finally gave up and made one.

I found this hobnail candle holder for 99 cents:


And this plate for 99 cents:


After a little gorilla glue epoxy I got this:


Cheap, easy, and a perfect fit with my milk glass collection!!


I'm adding this to all of my favorite linky parties - click on the buttons on the right to go and check them out!

Make Your Monday @ The Twice Remembered Cottage!

<br />http://www.thethriftyhome.com


Photobucket


Beyond The Picket Fence

Make it Yours @ My Backyard Eden


Related Posts with Thumbnails