Photobucket Photobucket Photobucket Photobucket Photobucket
Showing posts with label DIY. Show all posts

Key Holder!

Hi! Hope you all are doing well!

I am super excited about this project - I've wanted to make one for a while now! I have seen several variations of this project around the blogging world and decided to make it my own. I loved the way it turned out - so much that I actually gave to my mom as part of her Mother's Day gift!


I started out with these supplies:

Wood plaque - $1.00 on the clearance rack @ Wal-Mart
Scrapbook Paper - already had in my stash of paper
ceiling hooks - $1.59
decoupage - already had
White Spray paint - already had
sand paper - already had


First I cut the paper to fit the inside of the wood piece. I did this by tracing the shape on to the back of the paper - then I just cut out the shape. (I made sure to have a little overlap so I could sand it down and make it a perfect fit.)

Next I gave it a light sand and spray painted the edges white. After allowing it to dry for an hour or so I applied decoupage to the wood piece (not the paper - I tried this first and it was disastrous!)

After letting it dry for a bit I took my sand paper and lightly rubbed the edges of the paper so I would be flush with the plaque. Then I marked off my spots for holes and screwed the hooks in place. I got the self starting hooks so I wouldn't have to pull out the old drill...


This project has endless possibilities - I can't wait to make another one to keep for myself!!


Pretty Little Cloche

Aint' she a beaut!


I made this cute little cloche thingy out of things bought at GoodWill, the dollar tree, and a family heirloom brooch! I wanted to display the brooch that belonged to a family member that and was passed on to me (I'm not much of a pin wearer). A shopping trip to GoodWill yielded a cloche and a milk glass base to put it on!!!! I just filled milk glass dish with some Spanish Moss I got at the Dollar Tree, sat the brooch on top of it, and placed the dome over it!

Total amount spent: $3.50!!


White Bowls...

Hey Everybody - hope your weekend went well!

I've had several emails in the past few weeks about some white bowls that were in a picture in my Apothecary Spice Jar post. So - I thought I would post about them!

They started off like this:


I pulled out my trusty sand paper and gave them a good rub or two and then spray painted them white. Then I sprayed them with a clear top coat protectant to keep scratches to a minimum.

And here they are after:


Just as pretty as can be! I paid $2.72 for all three at Goodwill - I love me some Goodwill!

Yay - I'm back - and with a new headboard!!

So - I am finally back! I took a week off to get caught up on projects and photo shoots and let me tell ya - I missed my little blog like crazy...

I was finally able to finish my headboard and we absolutely love it!

Here is a sneak peek of the finished job:


This was another really easy project (I got a little help from my Granddad) that only took an hour or so to complete.

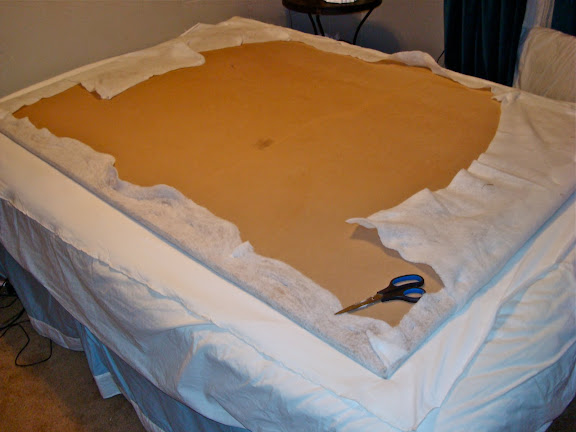
After measuring the space where the headboard would go I had my Granddad cut a piece of MDF. I needed something besides batting to pad it so I found an old egg crate mattress pad thingy and cut it to fit the MDF. Then I just spray glued it into place! After that I attached batting by stretching it around and stapling it to the back of the MDF.


Then I wrapped the white fabric around the whole thing and stapled it in place - and voila! It turned out to be sturdy enough that I didn't have to mount it to the wall - so that was a plus!


Here is a list of the supplies I used:

MDF - cut by my Granddad but if you usually can get it cut at the place you buy it
Spray Glue
Staple Gun
padding/batting
fabric

I already had everything except the fabric which I got in the clearance section at Hancock Fabric's for $2.00!


Apothecary Spice Jars

I don't know if I should classify this under DIY or so easy a cave man could do it...? I am addicted to Apothecary jars or all shapes and sizes - but I am especially drawn to the "candy dish" sized. Every time I go to Goodwill I come home with at least one. After most of them sat around for weeks collecting dust I finally decided that I needed to do something with them. SO - I turned them in to spice jars!


I doesn't get much easier than this!

Lazy Susan + Mugholder = Jewelry Holder

While browsing around Good Will the other day I came across a lazy susan and two mug holders. I stared at them for a while trying to come up with something to do with them - then the light bulb came on! I have an over abundance of jewelry and I hate digging through my jewelry armoire to find the pieces that I wear most often! SO - I decided to make a spinning jewelry holder for my dresser.

Here is a sneak peek of it in action:


Here are the pieces I started off with:

mug holder thingy ( I actually used 2 - one tall and one short $1.00 for tall and $.50 for short)


and this lovely $1.00 Lazy Susan:


All I did was spray paint each piece white and glued the holders down on the Lazy Susan. It would be hard to find an easier project!

Here is one more shot of the finished piece:


I already had the paint and glue so I got a really cool jewelry holder for only $2.50!

Someone asked me why I painted it all white - I did that so the jewelry would stand out more and take center stage!!


Thrift Store Mirror to Shabby Chic Jewelry Tray

I found this gold mirror @ a local thrift/junk store (Bowmart to all of you local readers).


I wasn't sure what to do with it but because it was a dollar so I took it home. I needed something for my nightstand to hold jewelry (I'm always taking my earrings off and laying them on the nightstand.)


First I removed the backing and pried the mirror off.


Then I spray painted it a glossy white. Before it dried I took a dry paint brush and rubbed some of the paint off to give it a distressed look.


I glued the mirror to the original cardboard backing. Then I glued fabric on to it. Once it dried I hot glued it back into the frame.


And now I have a jewelry tray for my nightstand!!


Yippee Skippee Part 2!!

As I mentioned in this post Karl and I were also working on a Race car room! Here is the final product - all hand painted by my super talented husband and me!

This is for above the bed:


And this is the super cool CHALKBOARD racetrack and race cars that completely circles the room!!


I'll be uploading this to all of my favorite linky parties!! Go here to check all of them out!!!


Yippee Skipee!

I am so excited about this post!!! Karl and I did this mural over the weekend for my cousin Deanna's new home. It's in her baby's (Reese) room. (Just imagine the crib in front of it!)


Sorry for the bad pictures. The lighting wasn't the best.

Karl free handed the shapes and I helped shade in the colors. Here is a close up of the super cute little birdie:


At the last moment we decided to add the owl at the top...here is Karl contemplating where to put it:


And here I am working on the branches:


We are also working on her son's (Garrett) race car room...pics to come later!!

I'll be uploading this to all of my favorite linky parties! Go to the link at the top to check all of them out!


Cutie Pie Door Hangers

I'm putting together a house warming gift and needed something for the kids...so I decided to make something they could hang on their doors!


Here are the supplies I used:

Canvas, paper, chipboard letters, wood cut out of a race car and butterfly, Mod Podge, glue, acrylic paint and the usual tools:


First I covered the the letters with paper - while that was drying I covered the canvas with paper. I did both with Mod Podge.


After everything was dry I used my exacto knife to cut out the letter. The I glued the letter to the canvas and the wood cut out to the letter. The butterfly wasn't the right colors so I just used acrylic paint to change it up a little bit. For the G I used a little sandpaper to rough it up a little bit (it is for a little boy after all) and I didn't have the right color of brown paper so I painted the canvas.

Really easy and super cute!!

I'll be linking this to all of my favorite linky parties! Go the the tab above to check them out!!!

Fabric Covered Monogram Canvas!

I have been trying to get this canvas done for a while now...it's finally done!!


I couldn't find my staple gun so I used hot glue to attach the fabric to the canvas.
Here's how I tackled the corners:

Pinch the fabric:


Fold over the corner:


Then fold it over again:


Hot glue it down (or staple it) and your all finished!!


The canvas is a recycled one from a previous project that no longer matches my decor, I already had the fabric (a whole roll of upholstery fabric for free), and I got the chipboard H at hobby lobby for 50% off!!!

I'll be uploading this to all of my favorite linky parties!!! Check out the tab above and go and visit them!!

Related Posts with Thumbnails