Hey everybody! Today I am doing a blogswap with the awesome Ashley from Simply Designing! Head on over to her blog and check out my post there!!
Hello!! I am so excited to be guest blogging here at Made by Stephie! I always love a good blog swap!
Isn't this just a great blog?! I am so honored to be here and I really hope I don't mess it up :-)
I am Ashley, the face and voice behind
Simply Designing! I am fairly new to blogland but am loving every minute of it! I am an interior designer and a floral designer. I own my own business. I also love to dabble in crafts, baby / child items, sewing, baking, cake decorating and a variety of other things. I love finding ways to make my life more SIMPLE!
I enjoy keeping busy and I have a list a mile long of "projects" I want to do. And I love posting about my projects on my
blog!
In addition, I am a wife to a wonderful husband and a mom of a 3.5 year old spunky little girl and a sweet cuddly 6 week old little boy! So much fun!
Oh. And in my spare time (ha!) I am attempting to open and then promote an
Etsy shop. It is a slow process for me, but I am enjoying that too. (
Go check it out if you don't mind!)
Ok. Now. On to the GOOD stuff!
I am so excited to be guest posting here today. I am actually going to show off a tutorial that has been one of my most popular tutorials! It is so much fun! I just love it!
I wanted to share with you my tutorial for making
simple, but the best EVER, Burp Cloths!
I made similar ones to these for my daughter but also received a myriad of other burp cloths at her baby shower. These were by far the most functional and the cutest!
I recently made some in anticipation of our son’s arrival (he was born February 22nd!), so these are more “boy” oriented ones, but you can obviously use any prints you want to.
I was lucky and found my fabric on a 50% off sale! Then I had a coupon for 20% off your entire purchase, even sale items. So, I figured my cost was 80 cents per burp cloth! (Plus the thread costs, but since we didn’t need to buy new thread…).
So not only are they the best burp cloths, they are also the cheapest!
Here is what you will need:
• Brown paper grocery store bag to make a pattern with (or, if you don't want to make your own template, go
here to purchase a template!)
• Ruler
• Pencil/Pen
• Scissors for paper
•
Fabric Pins
•
Fabric scissors
• 1/3 yard flannel fabric per burp cloth (44”-45” wide fabric) (Flannel is the key here, so don’t buy cotton fabric. Spit up will just run off of cotton burp cloths and/or soak through to your clothes. Ew. The flannel fabric will absorb the spit up and they actually work better after each washing!)
• Matching or contrasting thread (4 spools of each color)
• A serger, or someone who loves you who owns a serger and is willing to sew a bit for you
Step 1: Prewash your fabrics
I know it is not a lot of fun, and I accidently left my flannels in the dryer too long and they became entangled and wrinkly (Yes, I then had to iron them before I could cut them out…don’t make that mistake!), but prewash your flannel fabrics. You will be SO happy you did this!
If you don’t, they will shrink and cause the edges of your burp cloths to become wavy and then your burp cloths will not look nearly as good and, if you are like me, you will want to iron your burp cloths, which really is a ridiculous thing to have to do.
So please, avoid the heartache and prewash all your flannels before you get started!
Step 2: Create your Pattern!
(or skip this step and buy one)
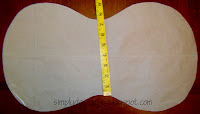
Use the following dimensions and photograph to sketch out your burp cloth pattern on to an open brown paper grocery bag.
This does not have to be perfect, but try to get it as symmetrical as possible. However, remember that you will be serging around these so that will make up for some discrepancy in this step.
Once you have the pattern sketches on the bag, cut it out.
Length: 19.5"
Width middle: 7.25"
Width (widest point): 10.5"
Step 3: Cut the burp cloths
Fold your fabric in half. You will be cutting two burp cloth sides at a time. These burp cloths are double sided and made with 2 pieces of flannel each. (1/3 yard fabric yields 2 burp cloths sides).
If you are really adventurous, you can put two, folded fabric pieces together and cut four sides at a time. However, if you try this, be sure to pay attention that the pattern fits in all directions on all fabric layers otherwise you may end up with a short burp cloth in there. Oops.
Pin the pattern to both thicknesses of flannel and cut!
I like to cut all my burp cloths at the same time before moving on.
Step 4: Decisions, decisions, decisions…pair your burp cloths
Decide how to pair your fabrics. You will use two flannel pieces to make one burp cloth. You can, of course, use the same pattern for both sides of the burp cloth, but I like to mix mine up!
You get 2 flannel sides out of 1/3 of fabric. So, if you choose 2 different fabrics, you will have 4 sides which means you can use one fabric for the front and one fabric for the back and you would have 2 matching burp cloths. (does that makes senses?)
Once you have figured out your pairing, place both sides, right-side out together.
Step 5: Serge
Ok, well I fall into the group who does not own a serger (but I have one I am eyeing so hopefully soon!). But I do know someone to owns a serger so I enlisted help for the final step of this project: serging the edges together!
With wrong sides together (right sides out), serge around the outside edge in either a matching, complementing, or contrasting color of thread, your choice!
(You can also finish these off using binding, sewing wrong sides together and flipping right side out or any other way you can imagine! I just like the look and the simplicity of doing a serged edge!)
Step 6: Use and Wash…or give away!
Use these burp cloths often and wash them to death! They will absorb better after each wash! Or make to give away as baby gifts!
And that's how it's done wonderful Made by Stephie readers!
Simple, but the best EVER, burp cloths!
Stop by my place if you have a moment and check out my
blog. I love to get new visitors and new followers! And, you can check out Stephie's
blog swap post there too!
Thank you so much for letting me come by and share my tutorial with you!
Happy Designing!
Ashley


